From legacy to cloud serverless
Part 3: Continuous Integration on Google Cloud


Welcome to the third part of this serie! In this segment, we dive into testings and pipeline configuration on Google Cloud, specifically focusing on continuous integration using Cloud Build, On-demand Vulnerability Scanner, and Artifact Registry. You can find the project repository here, or, if you prefer, you can bring your own project.
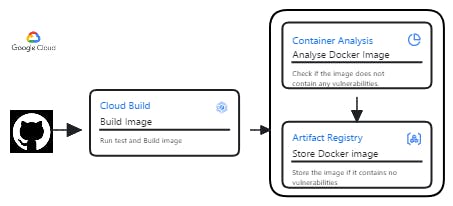
Let me walk you through the pipeline. With each push to the main branch, Cloud Build is triggered. First, it runs unit tests on the code. If the tests pass, it proceeds to build the image. After the image is built, Cloud Build invokes the image scanner to ensure it's free of vulnerabilities. If all is well, the image is sent and stored in the Artifact Registry, ready for deployment. But for this article, we'll focus solely on the CI part. Let's start with the tests.
Unittest
Here's the code we plan to test
import os
from flask import Flask
from pymongo import MongoClient
from flask import Flask, render_template, request, url_for, redirect
from bson.objectid import ObjectId
import mongomock


app = Flask(__name__, template_folder='templates')

if os.environ.get('TESTING'):
    client = mongomock.MongoClient()
else:
    client = MongoClient(os.environ['MONGO_URI'])


db = client.flask_db
todos = db.todos


@app.route('/', methods=('GET', 'POST'))
def index():
    if request.method=='POST':
        content = request.form['content']
        degree = request.form['degree']
        todos.insert_one({'content': content, 'degree': degree})
        return redirect(url_for('index'))

    all_todos = todos.find()
    return render_template('index.html', todos=all_todos)


@app.post('/<id>/delete/')
def delete(id):
    todos.delete_one({"_id": ObjectId(id)})
    return redirect(url_for('index'))
For an explanation of the code, refer to the first article in this series.
Now, let's move on to the testing phase
The test is written using Python's built-in unittest module, which provides a framework for writing and running tests.
Import necessary modules and create a mock MongoDB instance
The test begins by importing the necessary modules.
unittestis the testing framework,patchandMagicMockfromunittest.mockare used to replace parts of the system that you're testing with mock objects, andObjectIdfrombson.objectidis used to create unique identifiers. Theappandtodosare imported from theapp.pyfile.mongomockis used to create a mock MongoDB instance for testing, andflaskis used to manipulate the request context during testing.import unittest from unittest.mock import patch, MagicMock from bson.objectid import ObjectId from app import app, todos import mongomock import flask mock_db = mongomock.MongoClient().dbDefine the test case
A test case is defined by creating a new class that inherits from
unittest.TestCase. This class will contain methods that represent individual tests.class TestApp(unittest.TestCase):Set up the test environment
The
setUpmethod is a special method that is run before each test. Here, it's used to create a test client instance of the Flask app and enable testing mode.def setUp(self): self.app = app.test_client() self.app.testing = TrueWrite the test
The
test_index_postmethod is the actual test. It tests the behavior of the app when a POST request is sent to the index route (/).def test_index_post(self):Mock the database operation
The
patchfunction is used to replace theinsert_onemethod oftodoswith aMagicMock. This allows the test to simulate the behavior of the database operation without actually interacting with a real database.with patch('app.todos.insert_one', new_callable=MagicMock) as mock_insert_one:Create a test request context
A test request context is created for the app using
app.test_request_context. This allows the test to simulate a request to the app.with app.test_request_context('/'):Set the request method and form data
The request method is set to 'POST' and the request form data is set to a dictionary with 'content' and 'degree' keys.
 flask.request.method = 'POST'
 flask.request.form = {'content': 'Test Content', 'degree': 'Test Degree'}
Send a POST request to the app
A POST request is sent to the app using
self.app.post. The form data is passed as thedataargument.result = self.app.post('/', data=flask.request.form)Assert the expected results
The
assertEqualmethod is used to check that the status code of the response is 302. Theassert_calledmethod is used to check that theinsert_onemethod was called.self.assertEqual(result.status_code, 302) mock_insert_one.assert_called()
This test ensures that when a POST request is sent to the index route with the correct form data, the app responds with a 302 status code and inserts the data into the database.
Your test code should look something like the following:
import unittest
from unittest.mock import patch, MagicMock
from bson.objectid import ObjectId
from app import app, todos
import mongomock
import flask

# Create a mock MongoDB instance
mock_db = mongomock.MongoClient().db

class TestApp(unittest.TestCase):
    def setUp(self):
        # Create a test client instance
        self.app = app.test_client()
        # Enable testing mode. Exceptions are propagated rather than handled by the the app's error handlers
        self.app.testing = True

    def test_index_post(self):
        # Patch the insert_one method of todos with a MagicMock
        with patch('app.todos.insert_one', new_callable=MagicMock) as mock_insert_one:
            # Create a test request context for the app
            with app.test_request_context('/'):
                # Set the request method to 'POST'
                flask.request.method = 'POST'
                # Set the request form data
                flask.request.form = {'content': 'Test Content', 'degree': 'Test Degree'}
                # Send a POST request to the app
                result = self.app.post('/', data=flask.request.form)
                # Assert that the status code of the response is 302
                self.assertEqual(result.status_code, 302)
                # Assert that the insert_one method was called
                mock_insert_one.assert_called()
Now, to execute the test, set the environment variable TESTING=true, Setting TESTING=True switches the application to use a mock MongoDB client for testing, instead of the real MongoDB database.
Now, if your test is successful, let's move on to configuring Cloud Build.
Cloud Build setup
Follow the guide to connect Cloud Build to your repository and this one for initial configurations.
Once that's done, let's move on to writing the Cloud Build configuration file, where we'll instruct it on how to execute the pipeline, the steps involved, dependencies, and so on.
Cloud Build config file
The Cloud Build Config file is written in YAML, a human-readable data serialization language.
Here are the main sections of our config file:
Substitutions: These are user-defined variables that can be replaced in the Cloud Build configuration file. They are defined under the
substitutionskey. In this case,_REGION,_REPOSITORY,_IMAGE, and_SEVERITYare defined.substitutions: _REGION: us-central1 _REPOSITORY: from-legacy-to-cloud _IMAGE: from-legacy-to-cloud _SEVERITY: '"CRITICAL|HIGH"'Steps: These are the operations that Cloud Build will perform. Each step is a separate action and they are executed in the order they are defined.
Step 0: Install test dependencies: This step uses a Python 3.10 Docker image to install the test dependencies listed in
docker/requirements-test.txt. Theentrypointis set to/bin/bash, which means that the command that follows will be executed in a bash shell. Theargskey specifies the command to be executed, which in this case is a pip install command. The-cflag tells bash to read commands from the following string. The|character allows us to write multiple commands, which will be executed in order.- name: 'python:3.10-slim' entrypoint: '/bin/bash' args: - '-c' - | pip install --user -r docker/requirements-test.txt id: 'install-test-dependencies'Step 1: Run unit tests: This step also uses a Python 3.10 Docker image to run the unit tests defined in
test.py. Theexport TESTING=Truecommand sets an environment variableTESTINGtoTrue, which can be used to change the behavior of the application during testing. Thecd dockercommand changes the current directory todocker, where the test file is located. Thepython -m unittesttest.pycommand runs the unit tests intest.py.- name: 'python:3.10-slim' entrypoint: '/bin/bash' args: - '-c' - | export TESTING=True cd docker python -m unittest test.py id: 'run-tests'Step 2: Build the Docker image: This step uses the
dockerCloud Builder to build a Docker image from the Dockerfile located in thedocker/directory. The image is tagged with the commit SHA. ThewaitForkey is used to specify that this step should wait for therun-testsstep to complete before it starts. Theargskey specifies the command to be executed, which in this case is a docker build command. The-tflag is used to name and optionally tag the image in the 'name:tag' format.- name: 'gcr.io/cloud-builders/docker' args: ['build', '-t', '$_REGION-docker.pkg.dev/$PROJECT_ID/$_REPOSITORY/$_IMAGE:$COMMIT_SHA', 'docker/'] waitFor: ['run-tests'] id: 'build-image'
Step 3: Inspect the Docker image and write the digest to a file: This step uses the
dockerCloud Builder to inspect the Docker image and write the image digest to a file. The image digest is a unique identifier for the image. Thedocker image inspectcommand retrieves detailed information about the Docker image. The--formatoption is used to format the output using Go templates. The{{index .RepoTags 0}}@{{.Id}}template retrieves the first tag of the image and the image ID. The>operator redirects the output to a file. The&&operator is used to execute thecatcommand only if the previous command succeeded.- name: 'gcr.io/cloud-builders/docker' entrypoint: '/bin/bash' args: - '-c' - | docker image inspect $_REGION-docker.pkg.dev/$PROJECT_ID/$_REPOSITORY/$_IMAGE:$COMMIT_SHA --format '{{index .RepoTags 0}}@{{.Id}}' > /workspace/image-digest.txt && cat /workspace/image-digest.txt id: 'inspect-image'Step 4: Scan the Docker image for vulnerabilities: This step uses the
cloud-sdkCloud Builder to scan the Docker image for vulnerabilities. The scan ID is written to a file. Thegcloud artifacts docker images scancommand scans the Docker image for vulnerabilities. The--format='value(response.scan)'option is used to retrieve the scan ID from the response. The>operator redirects the output to a file.- id: scan name: gcr.io/google.com/cloudsdktool/cloud-sdk entrypoint: /bin/bash args: - -c - | gcloud artifacts docker images scan $_REGION-docker.pkg.dev/$PROJECT_ID/$_REPOSITORY/$_IMAGE:$COMMIT_SHA \ --format='value(response.scan)' > /workspace/scan_id.txtStep 5: Check the severity of any vulnerabilities found: This step uses the
cloud-sdkCloud Builder to list the vulnerabilities found in the Docker image and check their severity. If any vulnerabilities with a severity matching_SEVERITYare found, the build fails. Thegcloud artifacts docker images list-vulnerabilitiescommand lists the vulnerabilities found in the Docker image. The--format='value(vulnerability.effectiveSeverity)'option is used to retrieve the severity of each vulnerability. Thegrep -Exq $_SEVERITYcommand checks if any of the severities match_SEVERITY. Theechocommand prints a message and theexit 1command terminates the build if a match is found.- id: severity check name: gcr.io/google.com/cloudsdktool/cloud-sdk entrypoint: /bin/bash args: - -c - | gcloud artifacts docker images list-vulnerabilities $(cat /workspace/scan_id.txt) \ --format='value(vulnerability.effectiveSeverity)' | if grep -Exq $_SEVERITY; \ then echo 'Failed vulnerability check' && exit 1; else exit 0; fiStep 6: Push the Docker image to Google Cloud Artifact Registry: This step uses the
dockerCloud Builder to push the Docker image to the Google Cloud Artifact Registry. ThewaitForkey is used to specify that this step should wait for theseverity checkstep to complete before it starts. Thedocker pushcommand pushes the Docker image to a repository.- name: 'gcr.io/cloud-builders/docker' args: ['push', '$_REGION-docker.pkg.dev/$PROJECT_ID/$_REPOSITORY/$_IMAGE:$COMMIT_SHA'] id: 'push-image' waitFor: ['severity check']Images: This key specifies the Docker images that Cloud Build should build and push to the Google Cloud Artifact Registry. In this case, it's the Docker image built in Step 2.
images: - '$_REGION-docker.pkg.dev/$PROJECT_ID/$_REPOSITORY/$_IMAGE:$COMMIT_SHA'
This cloudbuild.yaml file defines a complete CI/CD pipeline for our application. It installs test dependencies, runs unit tests, builds a Docker image, inspects the image, scans the image for vulnerabilities, checks the severity of any vulnerabilities found, and pushes the image to the Google Cloud Artifact Registry. This pipeline ensures that the application is tested, secure, and ready for deployment.
The complete config file should look like this:
 substitutions:
   _REGION: us-central1
   _REPOSITORY: from-legacy-to-cloud
   _IMAGE: from-legacy-to-cloud
   _SEVERITY: '"CRITICAL|HIGH"'
steps:
# Step 0: Install test dependencies
- id: 'install-test-dependencies'
name: 'python:3.10-slim'
entrypoint: '/bin/bash'
args:
- '-c'
- |
pip install --user -r docker/requirements-test.txt
# Step 1: Run unit tests
- id: 'run-tests'
name: 'python:3.10-slim'
entrypoint: '/bin/bash'
args:
- '-c'
- |
export TESTING=True
cd docker
python -m unittest test.py
# Step 2: Build the Docker image
- id: 'build-image'
name: 'gcr.io/cloud-builders/docker'
args: ['build', '-t', '$_REGION-docker.pkg.dev/$PROJECT_ID/$_REPOSITORY/$_IMAGE:$COMMIT_SHA', 'docker/']
waitFor: ['run-tests']
# Step 3: Inspect the Docker image and write the digest to a file.
- id: 'inspect-image'
name: 'gcr.io/cloud-builders/docker'
entrypoint: '/bin/bash'
args:
- '-c'
- |
docker image inspect $_REGION-docker.pkg.dev/$PROJECT_ID/$_REPOSITORY/$_IMAGE:$COMMIT_SHA --format '{{index .RepoTags 0}}@{{.Id}}' > /workspace/image-digest.txt &&
cat /workspace/image-digest.txt
# Step 4: Scan the Docker image for vulnerabilities
  - id: scan
    name: gcr.io/google.com/cloudsdktool/cloud-sdk
    entrypoint: /bin/bash
    args:
    - -c
    - |
      gcloud artifacts docker images scan $_REGION-docker.pkg.dev/$PROJECT_ID/$_REPOSITORY/$_IMAGE:$COMMIT_SHA \
      --format='value(response.scan)' > /workspace/scan_id.txt
# Step 5: Check the severity of any vulnerabilities found
  - id: severity check
    name: gcr.io/google.com/cloudsdktool/cloud-sdk
    entrypoint: /bin/bash
    args:
    - -c
    - |
      gcloud artifacts docker images list-vulnerabilities $(cat /workspace/scan_id.txt) \
      --format='value(vulnerability.effectiveSeverity)' | if grep -Exq $_SEVERITY; \
      then echo 'Failed vulnerability check' && exit 1; else exit 0; fi
# Step 6: Push the Docker image to Google Cloud Artifact Registry
- id: 'push-image'
name: 'gcr.io/cloud-builders/docker'
args: ['push', '$_REGION-docker.pkg.dev/$PROJECT_ID/$_REPOSITORY/$_IMAGE:$COMMIT_SHA']
waitFor: ['severity check']
  images:
  - '$_REGION-docker.pkg.dev/$PROJECT_ID/$_REPOSITORY/$_IMAGE:$COMMIT_SHA'
View build results
Now, commit and push your changes. If the Cloud Build triggers are configured correctly, the build should be triggered. Connect to the Google Cloud Console, go to Cloud Build > History to view your builds.

If it fails, click on it to see the error messages and troubleshoot to resolve the issues. Once the build succeeds, you can access the Artifact Registry and see the stored image, ready for use.

What next ?
Well, that wraps up this article. In the next one, we'll delve into automating deployments—the CD part. After vulnerability scanning of container images, we'll be putting security policies in place through Binary Authorization, allowing only approved/trusted images to be deployed on Cloud Run. But before that, we'll migrate our Mongo database to Google Firestore. After that, we'll deploy our app on Cloud Run and connect it to Firestore to make it fully operational.
See you in the next article. Until then, I'm available on social media (I'm more active on LinkedIn) for any information or additional suggestions. Thanks for reading!