From legacy to cloud serverless
Part 4: Connecting Firestores, Automating Deployment and Securing the Supply Chain by Configuring Binary Authorization


Hello and welcome to this article in a journey of migrating a legacy-built app to the cloud. In this section, we will focus on three aspects: interfacing the application with Cloud Firestore, automating deployment, and exploring how Binary Authorization can reinforce supply chain security while aligning with security policies.
If you're joining us midway, I encourage you to take a look at the previous articles to get up to speed. Otherwise, let's dive in! 😊
integrating the app with Cloud Firestore
Our previous code interacted with MongoDB. With the migration to Google Cloud, we are transitioning away from MongoDB in favor of Firestore, which is Google Cloud's managed NoSQL document database built for automatic scaling, high performance, and ease of application development. To achieve this, we'll need to make modifications to our code, ensuring that our application seamlessly integrates and functions with Firestore.
We will replace the old MongoDB code with the following Firestore integration:
Old:
from pymongo import MongoClient
from bson.objectid import ObjectId
import mongomock
...
if os.environ.get('TESTING'):
    client = mongomock.MongoClient()
else:
    client = MongoClient(os.environ['MONGO_URI'])
db = client.flask_db
todos = db.todos
New:
from google.auth import compute_engine
from google.cloud import firestore
...
credentials = compute_engine.Credentials()
db = firestore.Client(credentials=credentials)
todos = db.collection('todos')
from google.auth import compute_engine: This line imports thecompute_enginemodule from thegoogle.authlibrary, which is used for authentication in Google Cloud environmentsfromgoogle.cloudimport firestore: This line imports thefirestoremodule from thegoogle.cloudlibrary, enabling interaction with Google Cloud Firestore.The
compute_engine.Credentials()call retrieves the default credentials provided by Google Cloud in its environment. These credentials are essential for authenticating with Firestore. In a local or non-Google Cloud service environment, you would need to generate a service account key before being able to authenticate with Firestore. However, in our case, since the code will be deployed on Cloud Run, authentication will be handled using the default service account of Cloud Run.todos = db.collection('todos'). Here, we're defining a Firestore collection. Collections are used to organize documents in Firestore.
Data Insertion: When a POST request is made, the new todo item is added to the Firestore collection 'todos' using the add method. The data is stored as a dictionary.
@app.route('/', methods=['GET', 'POST'])
def index():
    if request.method == 'POST':
        content = request.form.get('content')
        degree = request.form.get('degree')
        todos.add({'content': content, 'degree': degree})
Old:
todos.insert_one({'content': content, 'degree': degree})
New:
todos.add({'content': content, 'degree': degree})
This modification reflects the adjustment needed in the code for Firestore, moving from the insert_one method in MongoDB to the add method in Firestore for adding documents.
Data Retrieval: In the new code, we utilize todos.stream() to obtain a stream of documents from the Firestore collection. In the old code, we used todos.find() to get a cursor to the documents in the MongoDB collection.
Old:
all_todos = todos.find()
New:
all_todos = [{'_id': doc.id, **doc.to_dict()} for doc in todos.stream()]
We now use todos.stream() to iterate over documents and convert them to a dictionary format for retrieval. The '_id' field represents the document ID in Firestore.
Data Deletion: In the new code, we employ todos.document(id).delete() to remove a document from the Firestore collection. In the old code, we used todos.delete_one({"_id": ObjectId(id)}) to delete a document from the MongoDB collection.
Old:
todos.delete_one({"_id": ObjectId(id)})
New:
todos.document(id).delete()
The todos.document(id).delete() method is used to delete a specific document by its ID in Firestore.
After all these updates, the new app.py should look like this:
import os
from flask import Flask, render_template, request, url_for, redirect
from google.auth import compute_engine
from google.cloud import firestore

app = Flask(__name__, template_folder='templates')

# Use the default credentials provided by the Cloud Run environment
credentials = compute_engine.Credentials()

# Use these credentials to authenticate with Firestore
db = firestore.Client(credentials=credentials)

todos = db.collection('todos')

@app.route('/', methods=['GET', 'POST'])
def index():
    if request.method == 'POST':
        content = request.form.get('content')
        degree = request.form.get('degree')
        todos.add({'content': content, 'degree': degree})
        return redirect(url_for('index'))

    all_todos = [{'_id': doc.id, **doc.to_dict()} for doc in todos.stream()]
    return render_template('index.html', todos=all_todos)

@app.route('/<id>/delete/', methods=['POST'])
def delete(id):
    todos.document(id).delete()
    return redirect(url_for('index'))
The adjustments include using Firestore methods for data insertion (todos.add()), retrieval (todos.stream()), and deletion (todos.document(id).delete()), along with integrating the appropriate syntax for Firestore operations.
Testing the new code
To ensure the correctness of the new 'app.py' code, we have to update also the testing approach. The tests aim to verify the functionality of critical components, such as data insertion and deletion, within the context of Firestore integration.
import unittest
from unittest.mock import patch, MagicMock
from app import app

class TestApp(unittest.TestCase):
    def setUp(self):
        self.app = app.test_client()

    @patch('app.todos.add')
    def test_index_post(self, mock_add):
        response = self.app.post('/', data={'content': 'Test Todo', 'degree': 'Test Degree'})

        mock_add.assert_called_once_with({'content': 'Test Todo', 'degree': 'Test Degree'})
        self.assertEqual(response.status_code, 302)

    @patch('app.todos.document')
    def test_delete(self, mock_document):
        mock_delete = MagicMock()
        mock_document.return_value.delete = mock_delete

        response = self.app.post('/123/delete/')

        mock_delete.assert_called_once()
        self.assertEqual(response.status_code, 302)

if __name__ == '__main__':
    unittest.main()
Let's delve into the primary components of this testing suite:
Data Insertion Test (
test_index_post):This test simulates a POST request to the root endpoint ('/') of the application when a new todo item is added.
The
@patchdecorator is utilized to mock thetodos.addmethod, ensuring that actual Firestore interactions are bypassed during testing.The test asserts that the 'add' method is called with the expected data, and the response status code is as expected (302 for a successful redirect).
Data Deletion Test (
test_delete):This test mimics a POST request to the endpoint for deleting a specific todo item ('//delete/').
The
@patchdecorator is applied to mock thetodos.documentmethod, and a MagicMock is used to mock the 'delete' method of the Firestore document.The test verifies that the 'delete' method is called once and asserts the response status code after the deletion operation (302 for a successful redirect).
These tests ensure that data insertion and deletion operations interact seamlessly with Firestore. The use of mocking allows for isolated testing, focusing on specific components without the need for actual Firestore connections during the testing phase.
Now that the test has been added, you can re-run your Cloud Build pipeline to address any potential minor issues before proceeding with the deployment on Cloud Run.
Automating deployment (CD)
To automate the deployment on Cloud Run after building and pushing the image, add the following step to your Cloud Build configuration (cloudbuild.yaml):
# Step 8: Deploy the image to Cloud Run
- id: 'deploy-image'
  name: 'gcr.io/google.com/cloudsdktool/cloud-sdk'
  entrypoint: 'gcloud'
  args:
  - 'run'
  - 'deploy'
  - '$_SERVICE_NAME'
  - '--image'
  - '$_REGION-docker.pkg.dev/$PROJECT_ID/$_REPOSITORY/$_IMAGE:$COMMIT_SHA'
  - '--region'
  - '$_REGION'
  - '--platform'
  - 'managed'
  - '--allow-unauthenticated'
  waitFor: ['push-image']
This segment of the Cloud Build configuration file handles the deployment of the Docker image to Google Cloud Run. Here's a breakdown of each line's purpose:
id: 'deploy-image': Provides a unique identifier for this step within the Cloud Build configuration file.name: 'gcr.io/google.com/cloudsdktool/cloud-sdk': Specifies the Docker image to be used for this step, which, in this case, is the Google Cloud SDK image.entrypoint: 'gcloud': Sets the Docker entrypoint to 'gcloud,' the command-line interface for Google Cloud Platform.args: A list of arguments passed to the 'gcloud' command.'run' 'deploy' '$_SERVICE_NAME': Deploys a new revision of the Cloud Run service identified by$_SERVICE_NAME.'--image' '$_REGION-docker.pkg.dev/$PROJECT_ID/$_REPOSITORY/$_IMAGE:$COMMIT_SHA': Specifies the Docker image to deploy, located in the designated Google Cloud Artifact Registry repository.'--region' '$_REGION': Specifies the region where the Cloud Run service is deployed.'--platform' 'managed': Indicates that the Cloud Run service uses the fully managed version of Cloud Run.'--allow-unauthenticated': Permits unauthenticated requests to the Cloud Run service.
waitFor: ['push-image']: Directs Cloud Build to wait for the completion of the 'push-image' step before initiating this step.Afterwards, don't forget to update the substitution section of your Cloud Build configuration to reflect the variables used in this new step.
Now, you can push your code to trigger the pipeline. If the pipeline runs successfully, you will obtain the access link for your application. Navigate to the Google Cloud Console, go to Cloud Run, and click on the name of your newly deployed service to retrieve the access URL for your application.
Binary Authorization
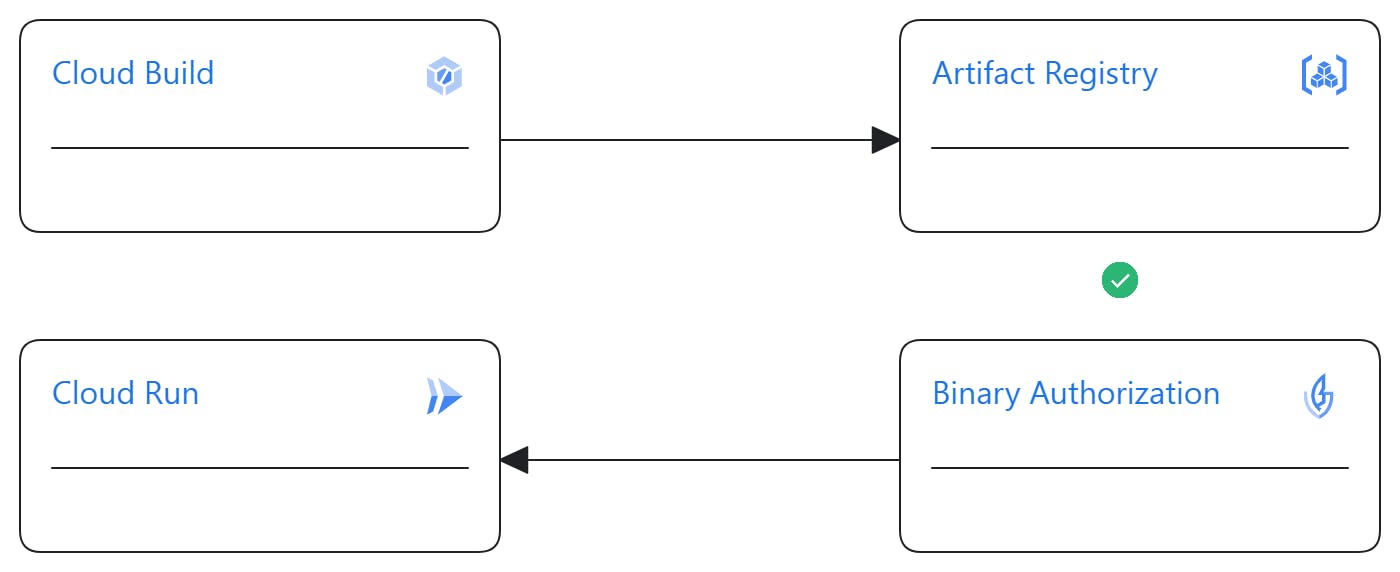
The Binary Authorization is a security control mechanism during the deployment of container images on Google Cloud platforms like Cloud Run, GKE, Anthos Service Mesh, and Anthos Clusters. Its primary function is to either authorize or control the deployment of images that have been attested as secure or trusted. This attestation involves subjecting the image to various processes such as testing, vulnerability scanning, and even manual signatures. Only after the image meets predefined conditions is it considered validated and allowed for deployment on the platforms.
Binary Authorization is responsible for defining and enforcing this policy. The controls or checks are executed using attestators, which can be custom-created, fixed, or generated by tools like Cloud Build (currently in preview).
For this project, I explored configuring Binary Authorization using the built-by-cloud-build attestor to deploy only images built by Cloud Build. With a well-crafted and robust Cloud Build configuration (incorporating various tests, vulnerability analyses, etc.), this approach can significantly save time compared to creating and using a custom attestor. However, as of the time of writing this article, Binary Authorization with cloud build attestor is in preview.
The main challenge with using the built-by-cloud-build attestor is that it is generated only once during the build with Cloud Build. This may not align well with continuous delivery (CD), especially for recurrent executions of the CI/CD pipeline. Ideally, with each new run of the pipeline, a new attestor should be generated to update the Binary Authorization policy. This becomes problematic, especially if the Binary Authorization policy is configured at the organization level, impacting all other deployments. From a personal perspective, to address this, it would be beneficial if Cloud Build generates the attestor once and uses it for subsequent pipeline executions. Currently, the custom attestor provides a workaround for this limitation. However, for simplicity, it would be ideal if Cloud Build handles this process seamlessly.
Follow this link for the setup of Binary Authorization."
This concludes the article. Thank you for reading. You can find the configurations and code for this project in the following Git repository.